
In this blog, I will implement a set of CRUD APIs. I will use Eclipse IDE and MySQL Workbench for this.
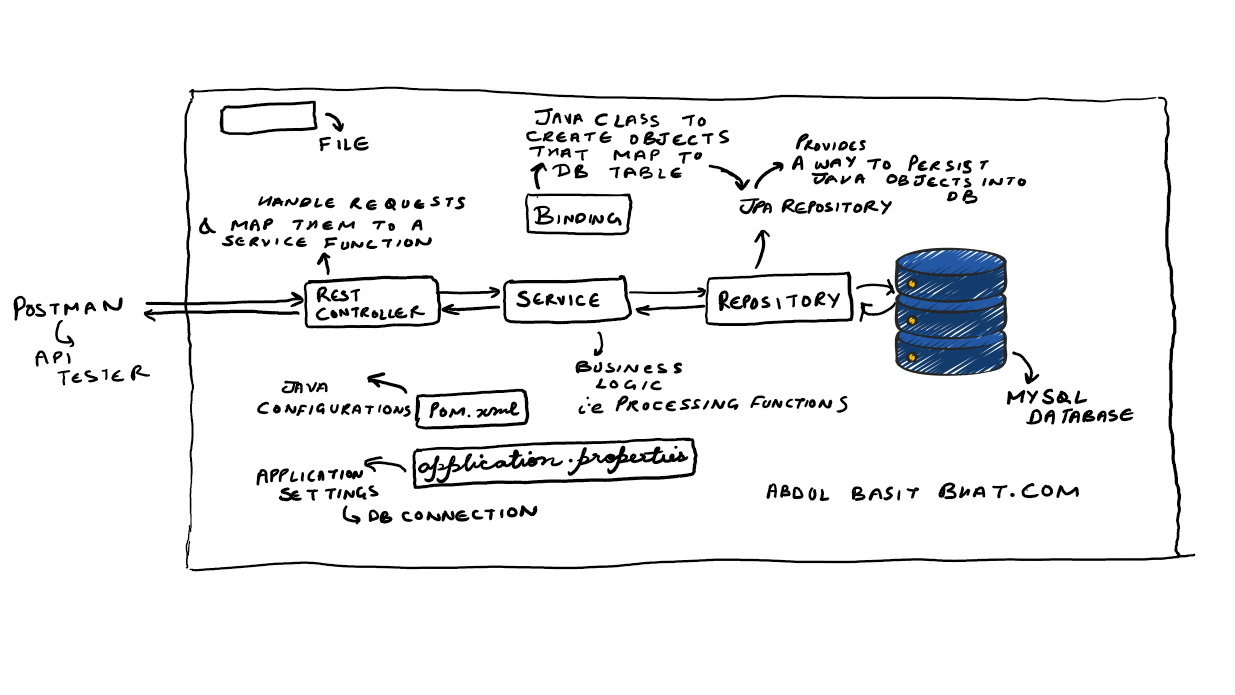
Introduction
The project structure will be like
Java projects have a layered structure, as do other languages, but I have never seen anything as well-structured as Java Spring Boot in terms of project organization.
We must create some files. The order of creation will help you develop the flow of how this works
Binding/Entity
In basic terms, an Entity is a class that represents a table row in the database using ORM. Previously, we had to use SQL queries for any CRUD. ORM stands for ‘Object Relational Model’, which means relating a Java Object directly to a database table row. No need to write any SQL Queries.
Repository Layer
Repository, in our case, is an interface that inherits/extends JpaRepository. This file is the only one we need to implement Spring Data JPA, which is a framework to achieve ORM, the easiest way. We don’t even need to write any CRUD functions here, let alone SQL queries.
Service Layer
This file contains all the functions that use data from the database, do the processing on it, and return a result. In fancy terms, these functions are called business logic. These functions are crucial and need to be abstracted, so a respective interface file needs to be created as well.
Rest Controller
It maps the incoming URL to the Service functions using its interface.
Pom.xml
We do not need to create one or do anything in this file. It is used for Spring configuration, and as we will use Spring Initializer, no need to worry about this. We will add the necessary dependencies using the GUI only.
Applications.properties
This file is also created automatically. But we need to add project settings to it. In our case, settings for our database connection are configured here.
Now that we have a basic understanding of the project, we should start implementing it right away.
Implementation
Project Setup
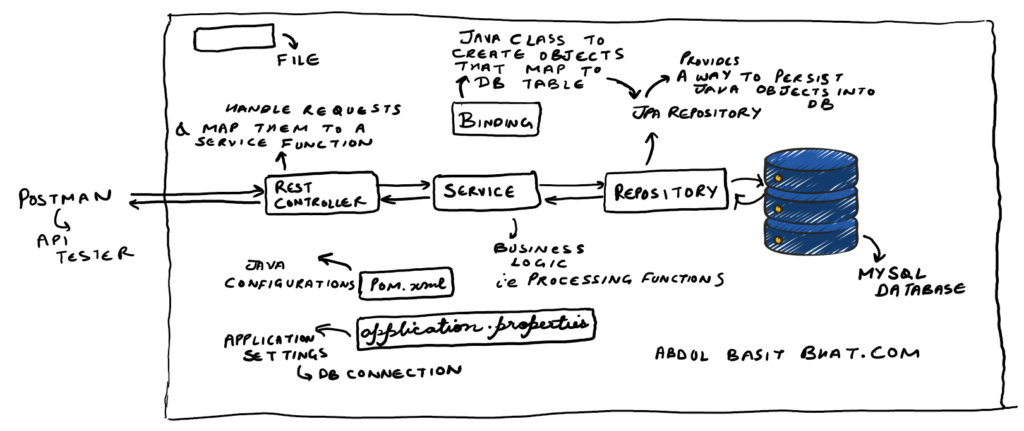
Go to start.spring.io and create a project template.
Keep the configurations similar to this, and add the dependencies I have added. Hit generate. This will download a zip file. Extract this file.
Now open the Eclipse IDE. You should have done this yesterday. Eclipse IDE takes a day to open. Just Kidding.
Click on File > Import > Search Maven and select ‘Existing Maven Project’ > Select your project folder. Wait for everything to load.
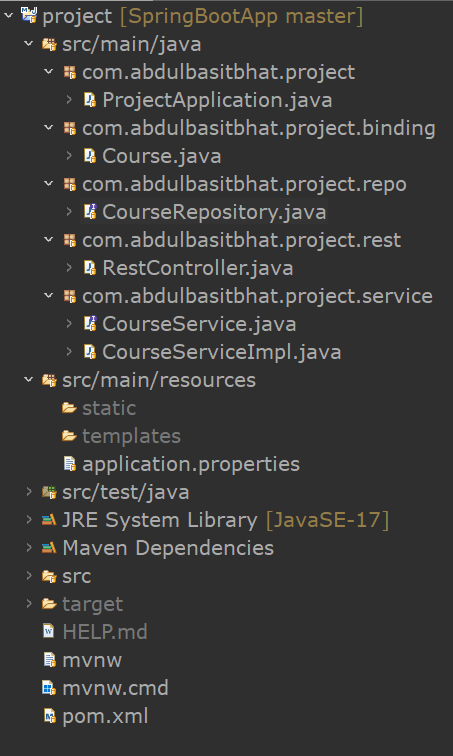
Now, try to create a file structure like this.
Course.java is our Binding/ Entity file to achieve ORM.
CourseRepository.java is our Repository file using JpaRepository inside.
CourseService.java is an interface that has its implementation in CourseServiceImpl.java
RestController.java maps the incoming requests to the functions described in the CourseService.java interface file.
Keep an eye on the application.properties and pom.xml files as well. The former is used for project setting, and the latter for project configurations. You will notice that the dependencies we added in Spring Initializer can be found in pom.xml. We did not need to do it manually.
Coding
ProjectApplication.java
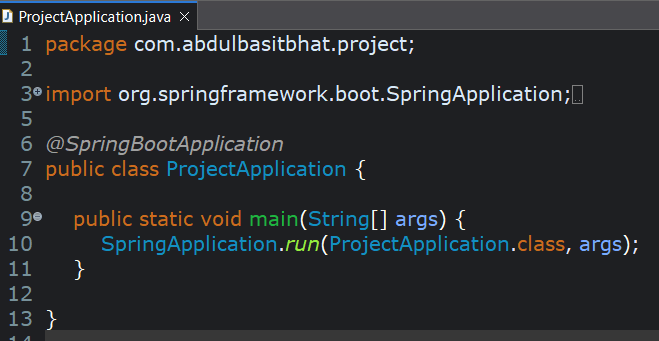
@SpringBootApplication is an annotation used to tell the IOC Container that this project is a Spring Project.
Courses.java
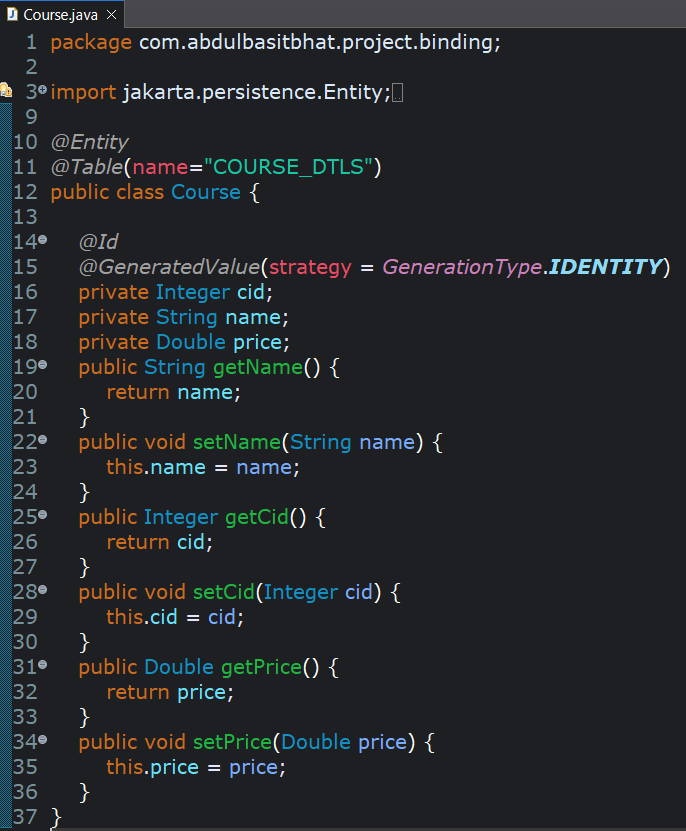
The @Entity and @Id annotations are important to create a Binding/Entity class. @Id makes an attribute as primary key.
@Table is used to give a custom table name. If it’s not provided, then the class name becomes the table name.
@GeneratedValue is used to create an automatic primary key generator, based on a strategy. I personally never use any other strategy other than GenerationType.AUTO or GenerationType.IDENTITY. Keep in mind that these strategies are database-dependent.
What this file did was create a class, the object of which looks like a table row and attributes as table columns. This row can be directly persisted into the database using JPA Data, i.e, JpaRepository, under the hood uses Hibernate. So any new object of “Course” class can make a row inside the database table named COURSE_DTLS with attributes cid, name, and price.
CourseRepository.java
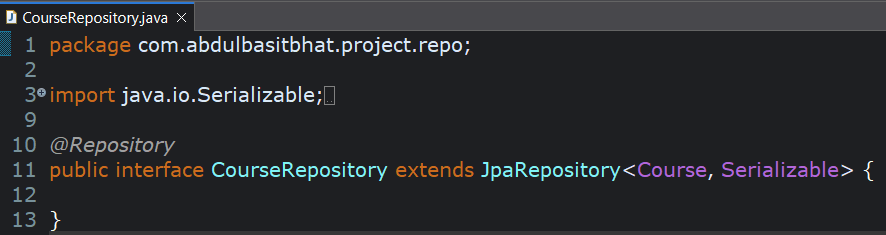
My favourite file to create. In my learning, I started from basic SQL queries, then Hibernate, and then this. And believe me, you would love this file too if you had to do the same.
What happens here is an interface named CourseRepository inherits JpaRepository class and uses “Course” as binding file whose primary key is Serializable. That’s it, no need to write any CRUD functions here, as JPA Data provides them internally. @Repository annotation is important, it tells the IOC container to know this is a repository.
CourseService.java

For our Business Logic, we use the Service layer, and for that, we need abstraction to hide implementation details. So, we create an interface first.
The CRUD functions are
- upsert -> A combination of insert and update. It inserts if the course is not present already; otherwise updates. It does this based on the primary key.
- getByID -> For retrieval based on Id.
- getAllCourses -> For retrieval of all courses.
- deleteById -> For deletion of an entry based on Id.
CourseServicesImpl.java
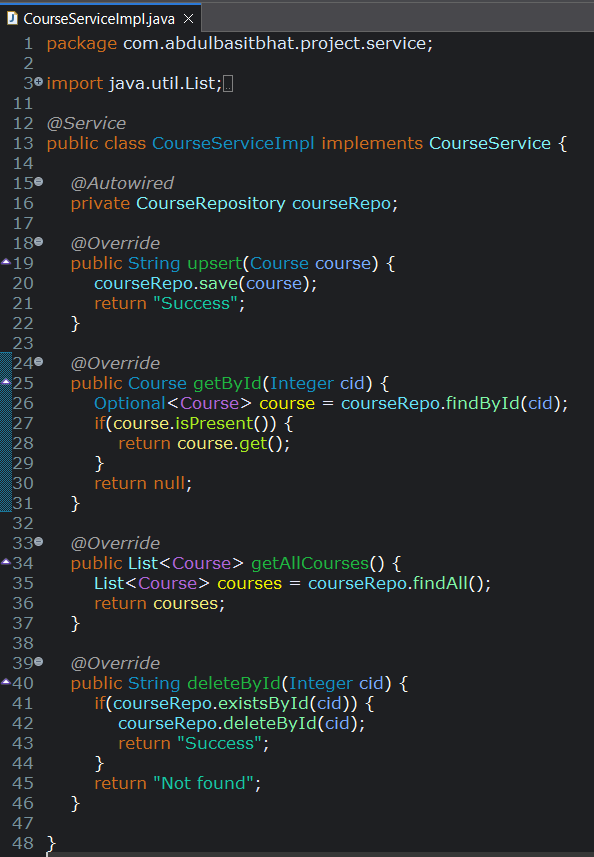
Actual business logic functions are written here. We need to use the CourseRepository to access the database. In IOC, to inject a class into another we use @Autowired annotation. Here courseRepo is an object of CourseRepository, which provides us with CRUD functions that are already implemented by JpaRespository.
@Service tells the Spring Framework that it’s a business logic layer.
RestController.java
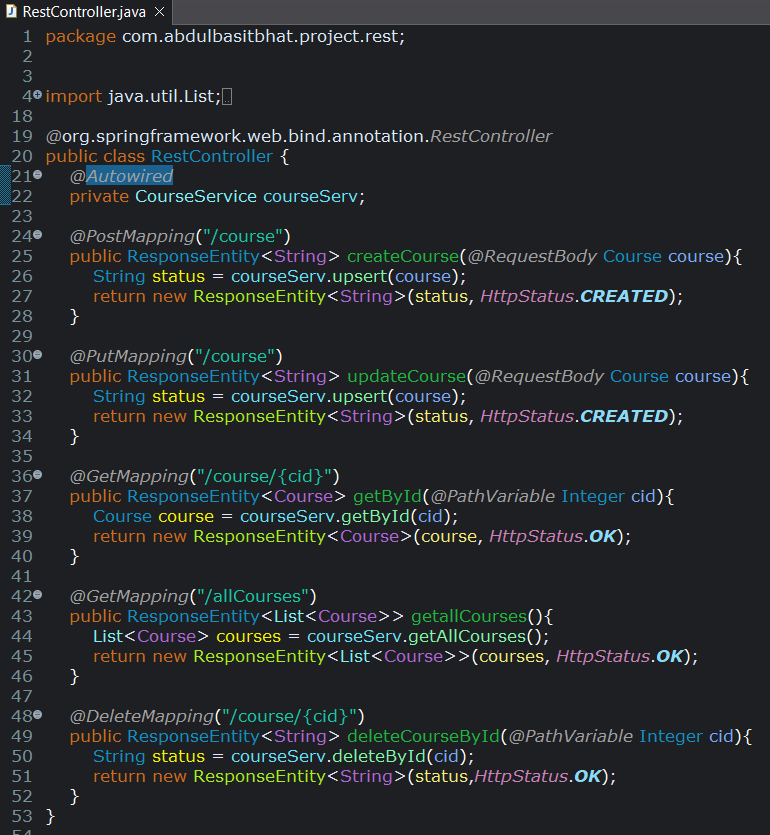
This file is the entry point of all requests. All the requests available are mapped to a function in the Service layer. So, we need to have a service layer object here to use the business logic functions. Again, we use the injection concept of IOC, i.e., @Autowired annotation, to create an object for the CourseService interface. This interface hides the implementation of the actual Service layer, i.e, CourseServiceImpl.java.
@RestController annotation tells the IOC container that it’s the request endpoint.
Database Connectivity
Now, we have created all the logic, but we are missing something. What?
Database configuration, which we will do in the application.properties file.
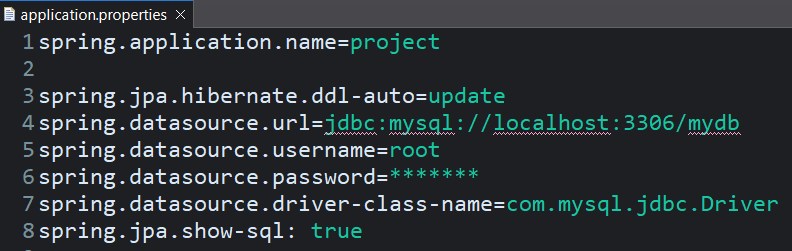
Don’t worry about line 3; it simply tells the project to use hibernate in update mode, other mode is insert. To be honest, I myself don’t know what it does, update works for me. In line number 8, we just tell the project to show us the conversion of ORM to table entry through SQL in the console. When we run the application in the console, we can see the SQL equivalent of our ORM logic.
Here in line 4, we have our database URL, my database name is ‘mydb’. Goto MySQL Workbench application and create the database as
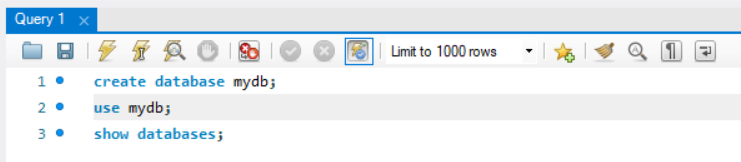
Don’t worry about table creation, it will be done automatically using the Jpa Data ORM concept.
Now, click on the ProjectApplication.java file and run it. We are done with our APIs being live locally.
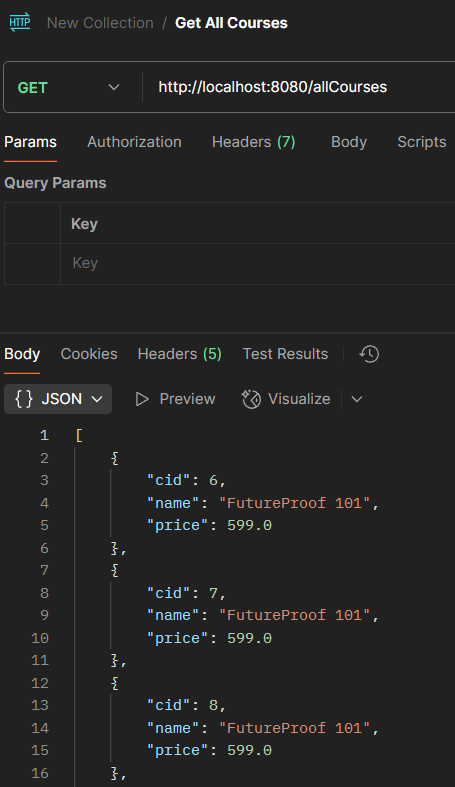
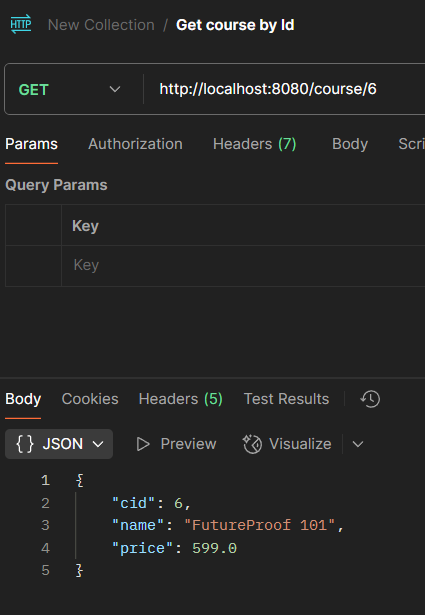
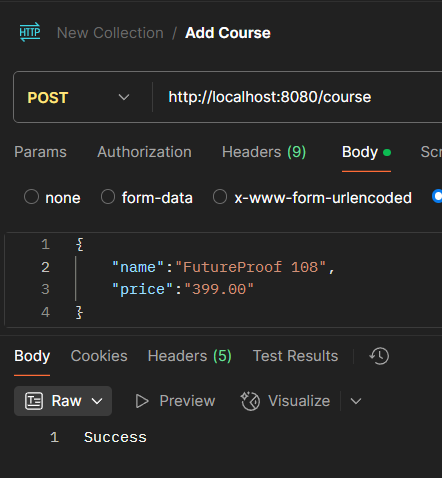
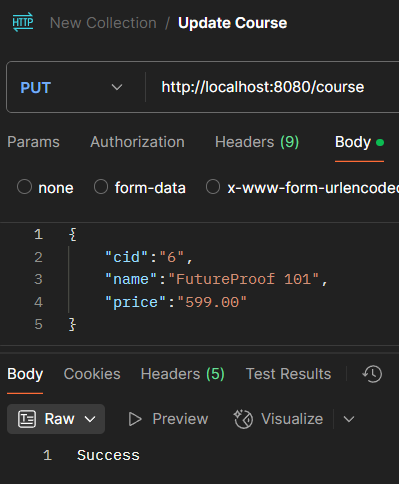
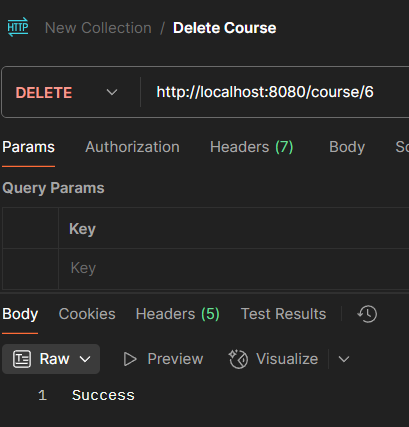
Now, we test them in Postman
Postman Testing
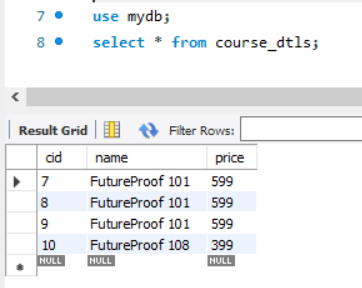
Check inside database
Hope you enjoyed, its easier than it looks once you create your own. Stay tuned. After this, we are going to learn and implement gRPC APIs
Happy Coding if it’s not automated AI when you read this. If it is, what are you doing here?